
With a mason jar lid and an old map, you can make a treasured keepsake ornament for someone. Make this easy DIY Christmas Map Ornament with a map that signifies a place of significance such as where you met your spouse, where you met your best friend, where you had your baby.
This is a simple craft where you can create an ornament that will hold a special place on your tree for years to come.

These personalized ornaments are some of my favorite to make, especially for where my husband and I first met.
Table of Contents
Supplies Needed for this Map Ornament

- World maps/Atlas
- Scissors
- Glue gun and sticks
- Pencil
- Canning jar lids and rings
- String/ribbon/twine
- Tiny Heart trinket
- Drill and drill bit
How to make a Map Ornament
Using your map, find the location special to you.
Take the canning jar lid and place it over your desired location making sure the destination is in the center of the lid.

Using your pencil, trace around the lid and then cut out the circle. Do this again for however many rings and destinations you are planning to make.
Take the canning rings and carefully drill a hole in each ring to attach a piece of string.

Put the canning ring face down, place the circular map cut out inside the ring facing down, and add the canning lid insert.
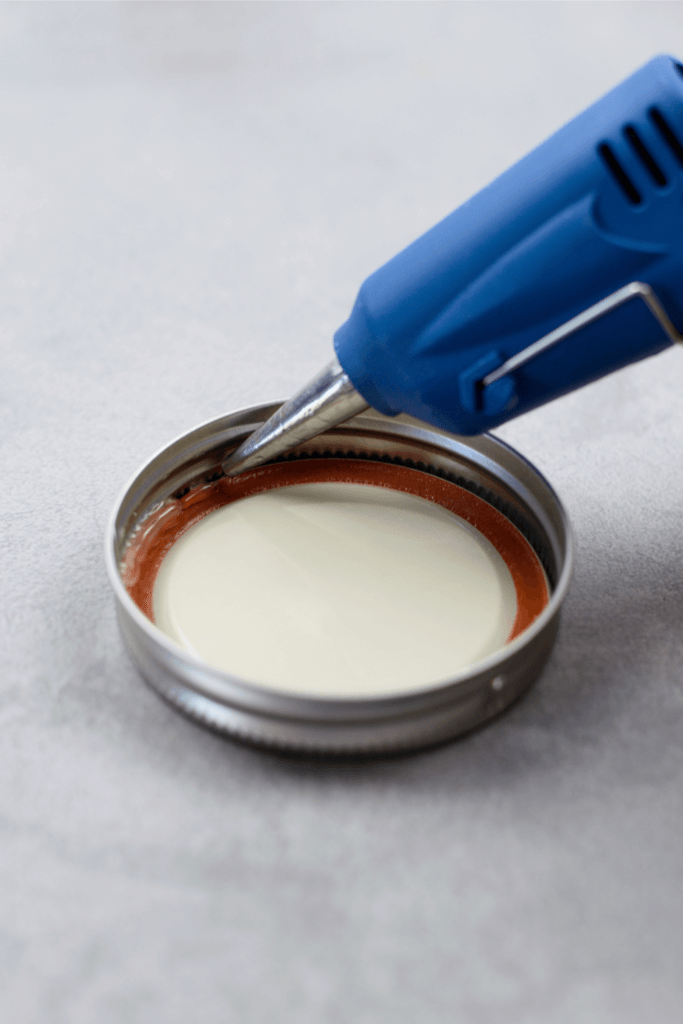
Before you start gluing, make sure all is aligned with the hole you drilled at the top and that you can properly see your chosen destination.
Once all is aligned, start placing a bead of glue all around the inner rims making sure to leave the hole bare to easily insert your string.
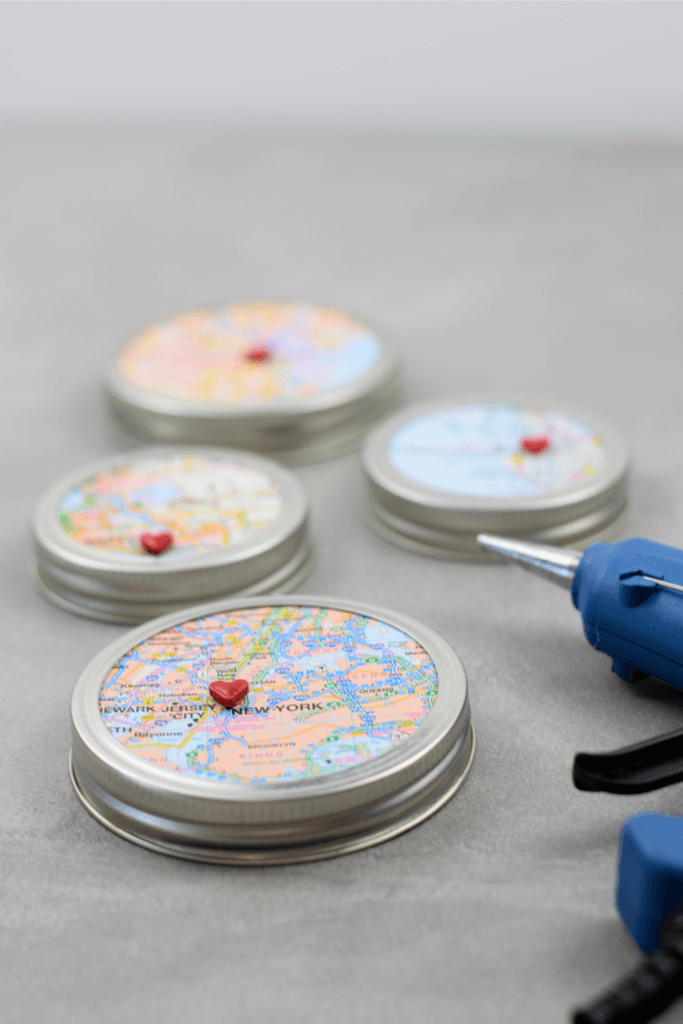
Carefully glue your hearts at their desired spots to highlight your meaningful destinations.
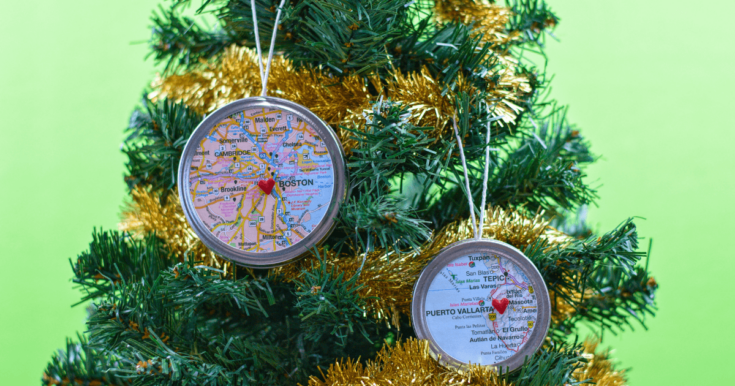
Finally, once your hearts have set, take your strings and insert them at the top of each completed ornament and tie a knot.

Hang your ornaments in your tree and cherish the memories of your destination wedding/ honeymoon/ anniversary/ family vacation, etc.
More DIY Christmas Ornaments
- How to make a Dollar Store Clay Pot Christmas Tree Ornament
- Make Your Own DIY Gumball Machine Christmas Ornament
- How to make a Santa Cam Christmas Ornament
- How to Make a Dollar Store DIY Santa Dinosaur Christmas Ornament
- NO SEW Easy Felt Snowman Ornament
- Tiny Santa Christmas Ornaments
- Mini Mason Jar Christmas Ornament
Christmas Treats to Make
- Andes Mint Chocolate Sugar Cookies
- Snow Globe Christmas Treats for Kids
- Christmas Santa Belly Treats
- Jack Frost Christmas Chocolate Bark
- Rudolph the Red-Nosed Reindeer Milkshake
- How to make Hot Cocoa Kisses Cookies
- How to Make a Christmas Sweets Charcuterie Board
Christmas Party Fun
- Let’s Have a Christmas Reindeer Hunt
- Christmas Lights Scavenger Hunt
- Free Kids Christmas Printable Games
- Free Printable Christmas Game Christmas Pictionary!
- Free Printable Christmas Name That Tune Game & More Christmas Games
DIY Map Christmas Ornament
Materials
- World maps/Atlas
- Canning jar lids and rings
- String/ribbon/twine
- Tiny Heart trinket
Tools
- Scissors
- Glue gun and sticks
- Pencil
- Drill and drill bit
Instructions
Using your map, find the location special to you.
Take the canning jar lid and place it over your desired location making sure the destination is in the center of the lid.
Using the pencil, trace around the lid and then cut out the circle. Do this again for however many rings and destinations you are planning to make.
Take the canning rings and carefully drill a hole in each ring to attach a piece of string.
Put the canning ring face down, place the circular map cut out inside the ring facing down, and add the canning lid insert.
Before you start gluing, make sure all is aligned with the hole you drilled at the top and that you can properly see your chosen destination.
Once all is aligned, start placing a bead of glue all around the inner rims making sure to leave the hole bare to easily insert your string.
Carefully glue your hearts at their desired spots to highlight your meaningful destinations.
Finally, once your hearts have set, take your strings and insert them at the top of each completed ornament and tie a knot.
Hang your ornaments in your tree!
Come Join Us!
Liked this article and want more? Follow along on Instagram, Facebook, Twitter, Pinterest, TikTok, and YouTube!
Come over and join us on Facebook in the group Recipes, Crafts, and more with TipToe Fairy or Sewing and Crafting with The TipToe Fairy!