
These Eyeball Cake Pops are made with ready made little tiny Twinkie cakes from Hostess. They’re little balls of glazed Twinkies. So, there’s no baking involved, just dipping and decorating for a creepy Halloween treat! This post contains affiliate links.

Table of Contents
Ingredients to make Eyeball Cake Pops

- Hostess Bouncers
- Gummy Eyeballs
- Red Sanding Sugar
- White Candy Melts
- Red Velvet Candy Melts
- Cake Pop Sticks
How to make Creepy Eye Ball Cake Pops?
Cover a cookie sheet with wax paper to lay the cake pops down. I find wax paper works better to release the candy melt treats than parchment paper.
Unwrap the Hostess Bouncers and stick a cake pop in them, so the flat side lays down flat on the wax paper.
Place them in the freezer for 15-30 minutes up to overnight before dipping in the candy melts.
If you can find “red velvet” candy melts, the color is a more muted red than just “red” candy melts. I think it works better with the eyes. I find mine at Joann Fabrics.
Measure about 1/3 cup of the red velvet candy melts. Microwave the red candy melts in the microwave in 30-second increments in a microwave-safe bowl. Stir after each 30 seconds, until the candy melts end up completely smooth. Don’t skip this step!
If you let them go longer than 30 seconds at a time, you run the risk of burning the candy melts.
I would recommend using 1 1/2 to 2 bags of white candy melts. There are about 15 Hostess Bouncers per box, and I found 1 bag of white candy melts were not enough.

Use this exact same method as the red velvet candy melts for the white candy melts, until they are smooth.
It took about two 30-second increments for the red velvet candy melts, and it took about four 30-second increments of the white candy melts to get them melted and nice.
You want a nice smooth honey consistency to the candy melts. If they seem gloppy, you can add a teaspoon of shortening, or my personal favorite is these Paramount flakes, which are oil flakes. I add a pinch at a time and stir them up, until the candy melt gets to the right consistency.

When you’re ready to dip, take a smooth and flick drizzles of the red velvet candy melt over the white candy melt. You’ll need to do this periodically after every few cake pops. Just be careful not to mix it up, so it doesn’t end up pink candy melt instead of somewhat white.

Then, dip the cake pops into the mixture and gently tap them on the side to remove excess. Set them on the wax paper.

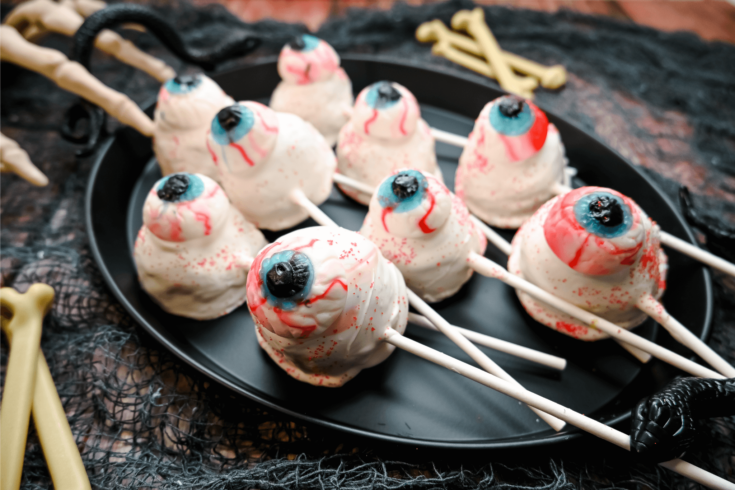
After every 2-3 cake pops, place a gummy eyeball on the center of each cake pop.

Add a sprinkle of red sanding sugar around the eye.

Place the cookie sheet into the freezer for 10 minutes to harden the candy melt.
Serve them on a Halloween-themed platter or package them up in cake pop bags.

More Halloween Treat Ideas
- More than 25 Easy Halloween Treats you can make with candy melts!
- Pumpkin Patch OREO cookies
- Halloween Peanut Butter Ghost Brownies with Fudge Frosting
- Monster Mash Halloween Cheesecake Bars
- How to make a Black Spooky Milkshake for Halloween
- How to make Rice Krispies Brains
- How to make Witch’s Brew Chocolate Piñatas
- Let’s Make Witch’s Brew Halloween Brownies
- Monster Toe on a Stick
- Poison Apple Punch
- Edible Eyeballs on a Stick
- Hocus Pocus Spell Book Brownie Halloween Treats
- Turn Your Twinkies into Halloween Twinkie Mummies
No Bake Eyeball Cake Pops
Ingredients
- 1 box Hostess Bouncers
- 2 pkgs white candy melts
- 1 pkg red velvet candy melts
- gummy eyeballs
- red sanding sugar
- cake pop sticks
Instructions
- Cover a cookie sheet with wax paper to lay the cake pops down. I find wax paper works better to release the candy melt treats than parchment paper.
- Unwrap the Hostess Bouncers and stick a cake pop in them, so the flat side lays down flat on the wax paper.
- Place them in the freezer for 15-30 minutes up to overnight before dipping in the candy melts.
- If you can find "red velvet" candy melts, the color is a more muted red than just "red" candy melts. I think it works better with the eyes. I find mine at Joann Fabrics.
- Measure about 1/3 cup of the red velvet candy melts. Microwave the red candy melts in the microwave in 30-second increments in a microwave-safe bowl. Stir after each 30 seconds, until the candy melts end up completely smooth. Don't skip this step!
- If you let them go longer than 30 seconds at a time, you run the risk of burning the candy melts.
- I would recommend using 1 1/2 to 2 bags of white candy melts. There are about 15 Hostess Bouncers per box, and I found 1 bag of white candy melts were not enough.
- Use this exact same method as the red velvet candy melts for the white candy melts, until they are smooth.
- It took about two 30-second increments for the red velvet candy melts, and it took about four 30-second increments of the white candy melts to get them melted and nice.
- You want a nice smooth honey consistency to the candy melts.
- When you're ready to dip, take a smooth and flick drizzles of the red velvet candy melt over the white candy melt. You'll need to do this periodically after every few cake pops. Just be careful not to mix it up, so it doesn't end up pink candy melt instead of somewhat white.
- Then, dip the cake pops into the mixture and gently tap them on the side to remove excess. Set them on the wax paper.
- After every 2-3 cake pops, place a gummy eyeball on the center of each cake pop.
- Add a sprinkle of red sanding sugar around the eye.
- Place the cookie sheet into the freezer for 10 minutes to harden the candy melt.
- Serve them on a Halloween-themed platter or package them up in cake pop bags.
Nutrition Information:
Yield:
15Serving Size:
1Amount Per Serving: Calories: 22Total Fat: 0gSaturated Fat: 0gTrans Fat: 0gUnsaturated Fat: 0gCholesterol: 2mgSodium: 8mgCarbohydrates: 4gFiber: 0gSugar: 3gProtein: 0g
Any nutritional information on thetiptoefairy.com should only be used as a general guideline. This information is provided as a courtesy and there is no guarantee that the information will be completely accurate.
Come Join Us!
Liked this article and want more? Follow along on Instagram, Facebook, Twitter, Pinterest, TikTok, and YouTube!
Come over and join us on Facebook in the group Recipes, Crafts, and more with TipToe Fairy or Sewing and Crafting with The TipToe Fairy!