
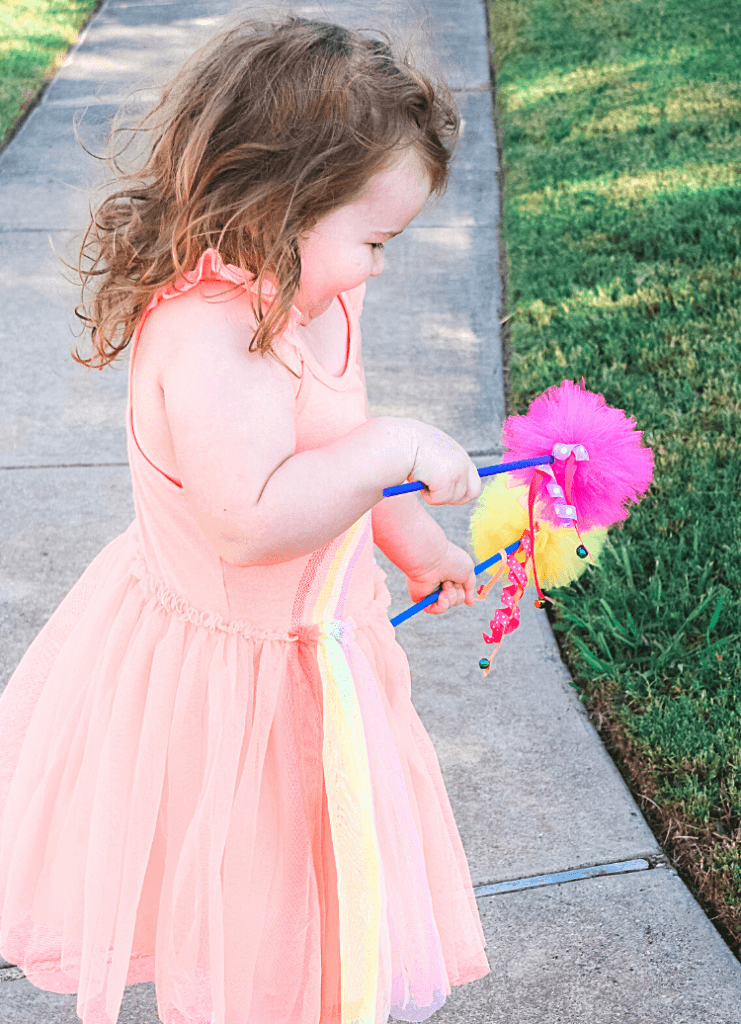
Every fairy needs a wand to do her magic. Today we’re making beautiful puffs of fairy wands with the tinkling of bells. Follow along in this easy tutorial to make a fairy wand with tulle for your sweet little fairy for pretend play or Halloween.
updated 5/11/2024

I’m not sure if they are still having craft fairs, but these are a perfect little craft item that little girls love to find. They make great gifts with a pair of fairy wings, too.
Table of Contents
What do you need to make a fairy wand with tulle?
- 1-2 rolls of tulle
- a 1/4-inch dowel rod
- 1/4 inch grosgrain ribbons
- bells
Download the File
How do you make a fairy wand with tulle?
The base of the wand is made from a 1/4-inch dowel rod. The top of the wand is made from a pompom made of colorful tulle.
Start with painting the dowel rods with cheap acrylic paint. I just recently got this set of paints, and they are so beautiful. The colors are all so vibrant. The box has them all organized by color in a little stand. Plus, it comes with paint brushes!
The dowels will most likely be dry by the time you finish making 4-5 puffs of tulle.
Make the cardboard circles to make the tulle pompoms. Click HERE to download a pattern for them. Once you’ve cut them from cardboard, don’t forget to cut the line down one part of the circle. This makes it easy to wrap the tulle around.
One 25-yd roll of tulle will make about 5-6 puffs for wands. I use about 4-5 yards to make one puff.
Once you’ve cut the tulle and tied it off into the pompom, then you’ll need to shape it. I use fabric scissors for this because they’re sharp.
This does not have to be perfectly shaped. If you keep cutting and cutting, you’ll end up with a nub of a pom pom. This also makes a HUGE mess, so I usually hold the puff over a box and shape it and then pour the clippings from the box directly into the trash.
At this point, the dowels should be dry.
I keep a box full of ribbon scraps from other projects, and this is the perfect project to use them. You need pieces about 6 to 10 inches long. I just coordinate similar colors and add 2-3 ribbons. You could also use tulle from this, too.
Just tie the ribbons to the very top of the dowel. Then, add a dollop or two of hot glue to keep them in place.
I like to add some extra decorations. Usually, I add 2-3 tiny bells to the ends of just some of the ribbons. The bells are about 1/4 inch in size. I also have added cute little buttons like bumble bees or flowers to the ends. I use hot glue to attach all of these.
Now it’s time to attach the tulle puffs to the top of the dowels. I find the knot I made when I tied the pom pom together and squirt a big giant dollop of hot glue right there and then set it right on the top of the dowel.
I squish the tulle for a few seconds while the hot glue hardens. Then, I fluff it back out and your fairy wand is finished!
More Creative Play Ideas
- Let’s Make a Dinosaur Tail
- Sew a Fleece Crown for Kids
- Paper Cup Puppets
- Make Butterfly Wings
- Paper Wizard Wands

How to Make Fairy Wands
Materials
- Spools of tulle
- 12-inch long 1/4-inch dowel
- acrylic paint
- 1/4 to 1/8 inch grosgrain ribbons
- 1/4 inch jingle bells
- piece of cardboard 13 x 7 inches long
Tools
Instructions
- Paint the dowel rods with acrylic paint and allow them to dry as you finish the tulle “puffs” for the wands.
- Cut two circle donut shapes out of cardboard. They do not have to be perfect, just as close in size as possible -- about 6 inches in diameter. Cut one section of the donut straight.
- Place the two donuts together on top of each other, so it looks like one.
- Begin wrapping the tulle around the donut. It will take about 4-5 yards to really cover it good.
- Take the scissors and cut the tulle all around the edges of the donut.
- Cut a piece of tulle about 12 inches long and insert it between the two pieces of cardboard and tie it tightly around all the tulle.
- Now the tulle will form a big pom pom. Use the scissors to sculpt it into a round shape and cut away any long pieces.
- Take short pieces of ribbon about 8-10 inches long and knot them around one tip of the dowel. Make sure this is high enough that when the tulle pom pom is glued on, the knots can't be seen.
- Cut the edges of the ribbons so they don't fray. You can also gently run the edges by a small flame to seal them or use fray check on the ends to seal.
- Add a dollop of hot glue to the knots of the ribbons on the dowel.
- Hot glue a bell to the ends of 2-3 of the ribbons.
- Find the knot in the center of the tulle pompom and add a big squirt of hot glue, then place it on the top of the dowel. Hold it for about 5 seconds to let it cool.
- That's it! The kids can play with them right away!
Stay tuned as we have an easy peasy fairy wings tutorial coming.