
This shop has been compensated by Collective Bias, Inc. and its advertiser. All opinions are mine alone. #MagicBabyMoments #CollectiveBias
My brother and his wife just had a new baby girl, and they love Disney. They head to Disney World at least twice a year. So, I thought a Disney Baby gift would be so much fun.
![Disney Baby bedding Ariel with DIY Jellyfish Decor Hangings @Walmart #MagicBabyMoments [ad] | The TipToe Fairy](https://thetiptoefairy.com/wp-content/uploads/2015/07/ariel-label.jpg)
When I saw the new Disney Baby bedding sets at Walmart, I just knew I had to get the Ariel set for their crib. Just about all my nieces and nephews are red heads.
![Disney Baby bedding Ariel with DIY Jellyfish Decor Hangings @Walmart #MagicBabyMoments [ad] | The TipToe Fairy](https://thetiptoefairy.com/wp-content/uploads/2015/07/ariel-collage.jpg)
This is a three-piece set with comforter, sheet, and dust ruffle. To go along wit them, I created these coordinating DIY jellyfish decorations to hang up in a corner of the baby room. Something fun to make and for baby to see.
![Disney Baby bedding Ariel with DIY Jellyfish Decor Hangings @Walmart #MagicBabyMoments [ad] | The TipToe Fairy](https://thetiptoefairy.com/wp-content/uploads/2015/07/ariel-jelly.jpg)
Table of Contents
Jellyfish Paper Lanterns
Supplies:
- 3-pk of paper lanterns in pink
- 1 package of pink tissue paper
- 1 package of sea foam green tissue paper
- scissors
- glue stick
- hot glue gun
- string
- hooks for hanging
![Disney Baby bedding Ariel with DIY Jellyfish Decor Hangings @Walmart #MagicBabyMoments [ad] | The TipToe Fairy](https://thetiptoefairy.com/wp-content/uploads/2015/07/ariel-5.jpg)
1. Put the lanterns together and set aside.
![Disney Baby bedding Ariel with DIY Jellyfish Decor Hangings @Walmart #MagicBabyMoments [ad] | The TipToe Fairy](https://thetiptoefairy.com/wp-content/uploads/2015/07/ariel-10.jpg)
2. Take the hot pink tissue paper and open it up. Then cut it into four squares.
![Disney Baby bedding Ariel with DIY Jellyfish Decor Hangings @Walmart #MagicBabyMoments [ad] | The TipToe Fairy](https://thetiptoefairy.com/wp-content/uploads/2015/07/ariel-6.jpg)
3. Next, cut a stack of squares into a circle. Then, starting at the edge of the circle, cut it into a spiral. These will be the jellyfish tentacles. Set aside.
4. Next, open up the sea foam green tissue paper and fold it into thirds lengthwise. Cut each third lengthwise.

5. Take one of these thirds and fold it in half lengthwise, then fold it again. Now cut strips all the way down it.
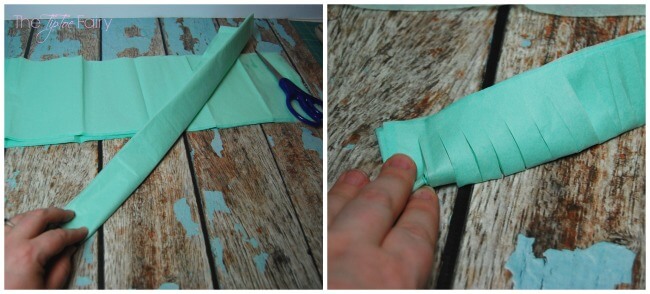
6. Unfold just the first fold and you’ll have slits like this. Now, on the second fold, cut all the way down, so that it forms a pile of these.
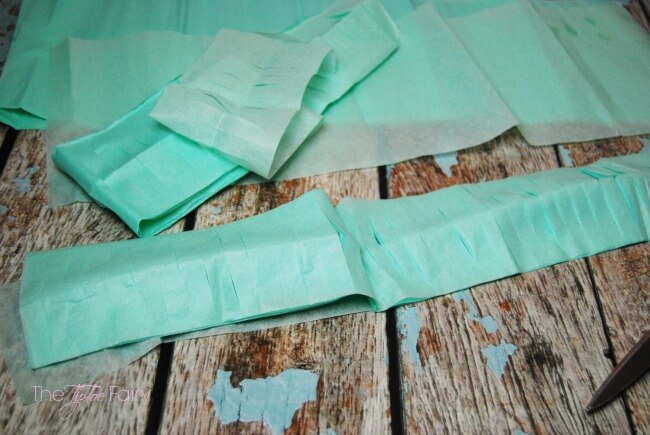
7. Once piece at a time, take a glue stick and go along one edge of the strip. Then fold it over, and you’ll have loops like this. Do this for several strips at a time.
![Disney Baby bedding Ariel with DIY Jellyfish Decor Hangings @Walmart #MagicBabyMoments [ad] | The TipToe Fairy](https://thetiptoefairy.com/wp-content/uploads/2015/07/ariel-12.jpg)
8. Now taking these pieces one at a time, begin hot gluing them in a circle starting at the lower fourth of the paper lantern and working your way down. When you begin, glue the first row upside down, so that the loops will hang down and hide the raw edges when you turn the lantern right side up.
![Disney Baby bedding Ariel with DIY Jellyfish Decor Hangings @Walmart #MagicBabyMoments [ad] | The TipToe Fairy](https://thetiptoefairy.com/wp-content/uploads/2015/07/ariel-14.jpg)
9. After the first round, then you can begin hot gluing the pieces right side up, so that the raw edge will be mostly hidden under the top round. Do this for about 3-4 rounds, until the bottom of the paper lantern is completely hidden by loops. You might check and then add an extra row or two, where there’s some pink spots you can see.
![Disney Baby bedding Ariel with DIY Jellyfish Decor Hangings @Walmart #MagicBabyMoments [ad] | The TipToe Fairy](https://thetiptoefairy.com/wp-content/uploads/2015/07/ariel-16.jpg)
10. Now take the pink spirals and hot glue them inside the bottom of the paper lantern. I used about 4-6. I glued one to the metal piece hanging in the middle, then I glued 4-5 from the inside bottom of the paper lantern like so.
![Disney Baby bedding Ariel with DIY Jellyfish Decor Hangings @Walmart #MagicBabyMoments [ad] | The TipToe Fairy](https://thetiptoefairy.com/wp-content/uploads/2015/07/ariel-8.jpg)
11. Now attach some string or ribbon to the very top of the lantern and hang from the ceiling WHERE THE BABY CANNOT TOUCH IT.
![Disney Baby bedding Ariel with DIY Jellyfish Decor Hangings @Walmart #MagicBabyMoments [ad] | The TipToe Fairy](https://thetiptoefairy.com/wp-content/uploads/2015/07/ariel-2.jpg)
Now you have some matching decor in the nursery that’s fun for baby to look at.
![Disney Baby bedding Ariel with DIY Jellyfish Decor Hangings @Walmart #MagicBabyMoments [ad] | The TipToe Fairy](https://thetiptoefairy.com/wp-content/uploads/2015/07/ariel-3.jpg)
Check out all the adorable Disney Baby nursery sets. Which one would you want, and what DIY would you make for it?
12 comments
I didn’t realize Walmart had such cute stuff for babies! I need ideas for decorating my baby girls nursery and I love these cute jellyfish decorations!
Those jellyfish are so clever! I love the colors and how they work so well with the bedding.
Those jellyfish are super cute…my kiddos would love to make these just for fun!
That would be lovely for a themed baby shower!
These are SO FUN! What an adorable idea!
These jellyfish are SO cute! Love them!
What a fun DIY project! I think children of all ages like Ariel and these jellyfish are a lot less threatening than the real ones! 🙂
These are so creative and absolutely adorable! My nieces would go crazy over these. We just took them to the aquarium and they kept talking about the octopus and it’s tentacles. They would love it!
What a fun and creative DIY project!! I would have never come up with that one!! Love the adorable bedding too!!
I am so in love with these! I am definitely going to make a version of these for my daughter’s room, especially as she’s due for an update. They go so well with the bedding you bought, too! #client
How cute is that! Super creative too!
Really cute! I love your website, TipToeFairy!